Cartridge Maintenance
As Smart-Jet printer is working, if the print quality is degraded, please check on the ink level in the cartridge.
- If the cartridge is out of ink, change the new cartridge.
- If the cartridge isn’t out of ink, the degraded print quality may be caused by the ink-spray, dust, or paper fiber being collected and built up on the surface of the nozzles plate. To maintain the print quality of the cartridge follow these wiping and purging tips.
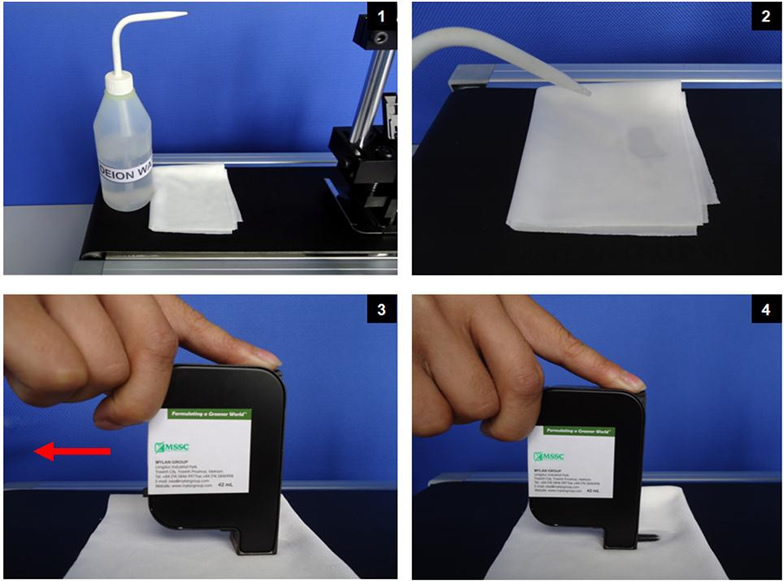
Wiping:
|
|
 |
|
Important Notes:
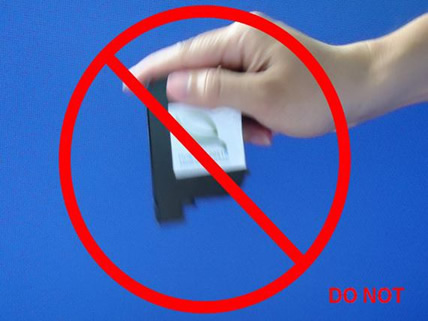
- Do not apply excessive force or use a dry or abrasive cloth to avoid scratching the orifice plate.
- Do not use a cloth with lint and the water that contains high percentage of suspended particles to avoid clogging the nozzles.
- Do not shake the cartridge as ink pressure will damage the nozzles.
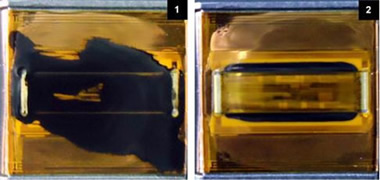
Purging:
- If the cartridge sits inactive and uncapped for a period of time, the ink may dry and form a viscous plug at the nozzles. The dried ink plug can cause misdirected drops and eventually block the nozzles. The white streaks will be visible in the printed text or graphic. To fix this problem, purge the ink plug out of the nozzles. Printing alone may not be sufficient to remove ink plugs from the nozzles. See the description above about how to run the Purge function in the printer.
- Then wipe the cartridge with a moist cloth to remove the excess ink on the surface of nozzle plate.
- After that print a few lines of text or graphics at high resolution to utilize more nozzles and push more ink out.
- Finally, check the printed image. If the print quality can’t be recovered, repeat this procedure several times. If it still doesn’t work, change the print cartridge.
In some instances whole swathes of nozzles are missing. In such situations the electrical contacts sending firing pulses to the cartridge from the Controller are being impeded by some kind of contamination. To clean: Remove the cartridge from the print head. Clean the gold contact foil with a gentle wipe across the contacts with a lint-free tissue and then clean the contacts on the print head. Rub with gentle pressure using a fresh lint-free tissue until contamination has been removed.
Storage Procedure:
For short term storing (less than one day):
- Leave the cartridge in the printer, capped or uncapped. Capping the cartridge is always recommended to prevent the nozzles from drying out or becoming clogged due to inks solvent evaporation or dusting.
- Wipe and/ or purge the cartridge next time it is used until good print quality is achieved
For long term storing (more than one day):
- Remove the cartridge from the printer
- Remember that all inkjet print cartridges produce a small amount of ink residue that may build up on the cartridge nozzles during printing. We need to wipe the cartridge to remove these ink residues from the nozzles plate.
- Tightly cap the print cartridge by sealing tape.
- Leave the cartridge uncapped and place it in an airtight container with moist dust- free cloth or sponge to prevent cartridge’s nozzles from drying out or becoming clogged. Close
the container tightly. - Wipe and/ or purge the print cartridge next time it is used until good print quality is achieved.
Important handling cautions:
- The cartridge has to be stored in a nozzle-up position.
- Never squeeze the ink reservoir as this will push ink out of the printhead.
- Never shake, drop or hit the printhead to avoid getting air in it.
- Never hold the printhead more than 10 inches above the ink reservoir when removing the system for storage to avoid getting air in it.
- Never hold the printhead below the reservoir to avoid ink leakage.